
Bill of Lading OCR
Automatically extract data from Bill of Lading documents
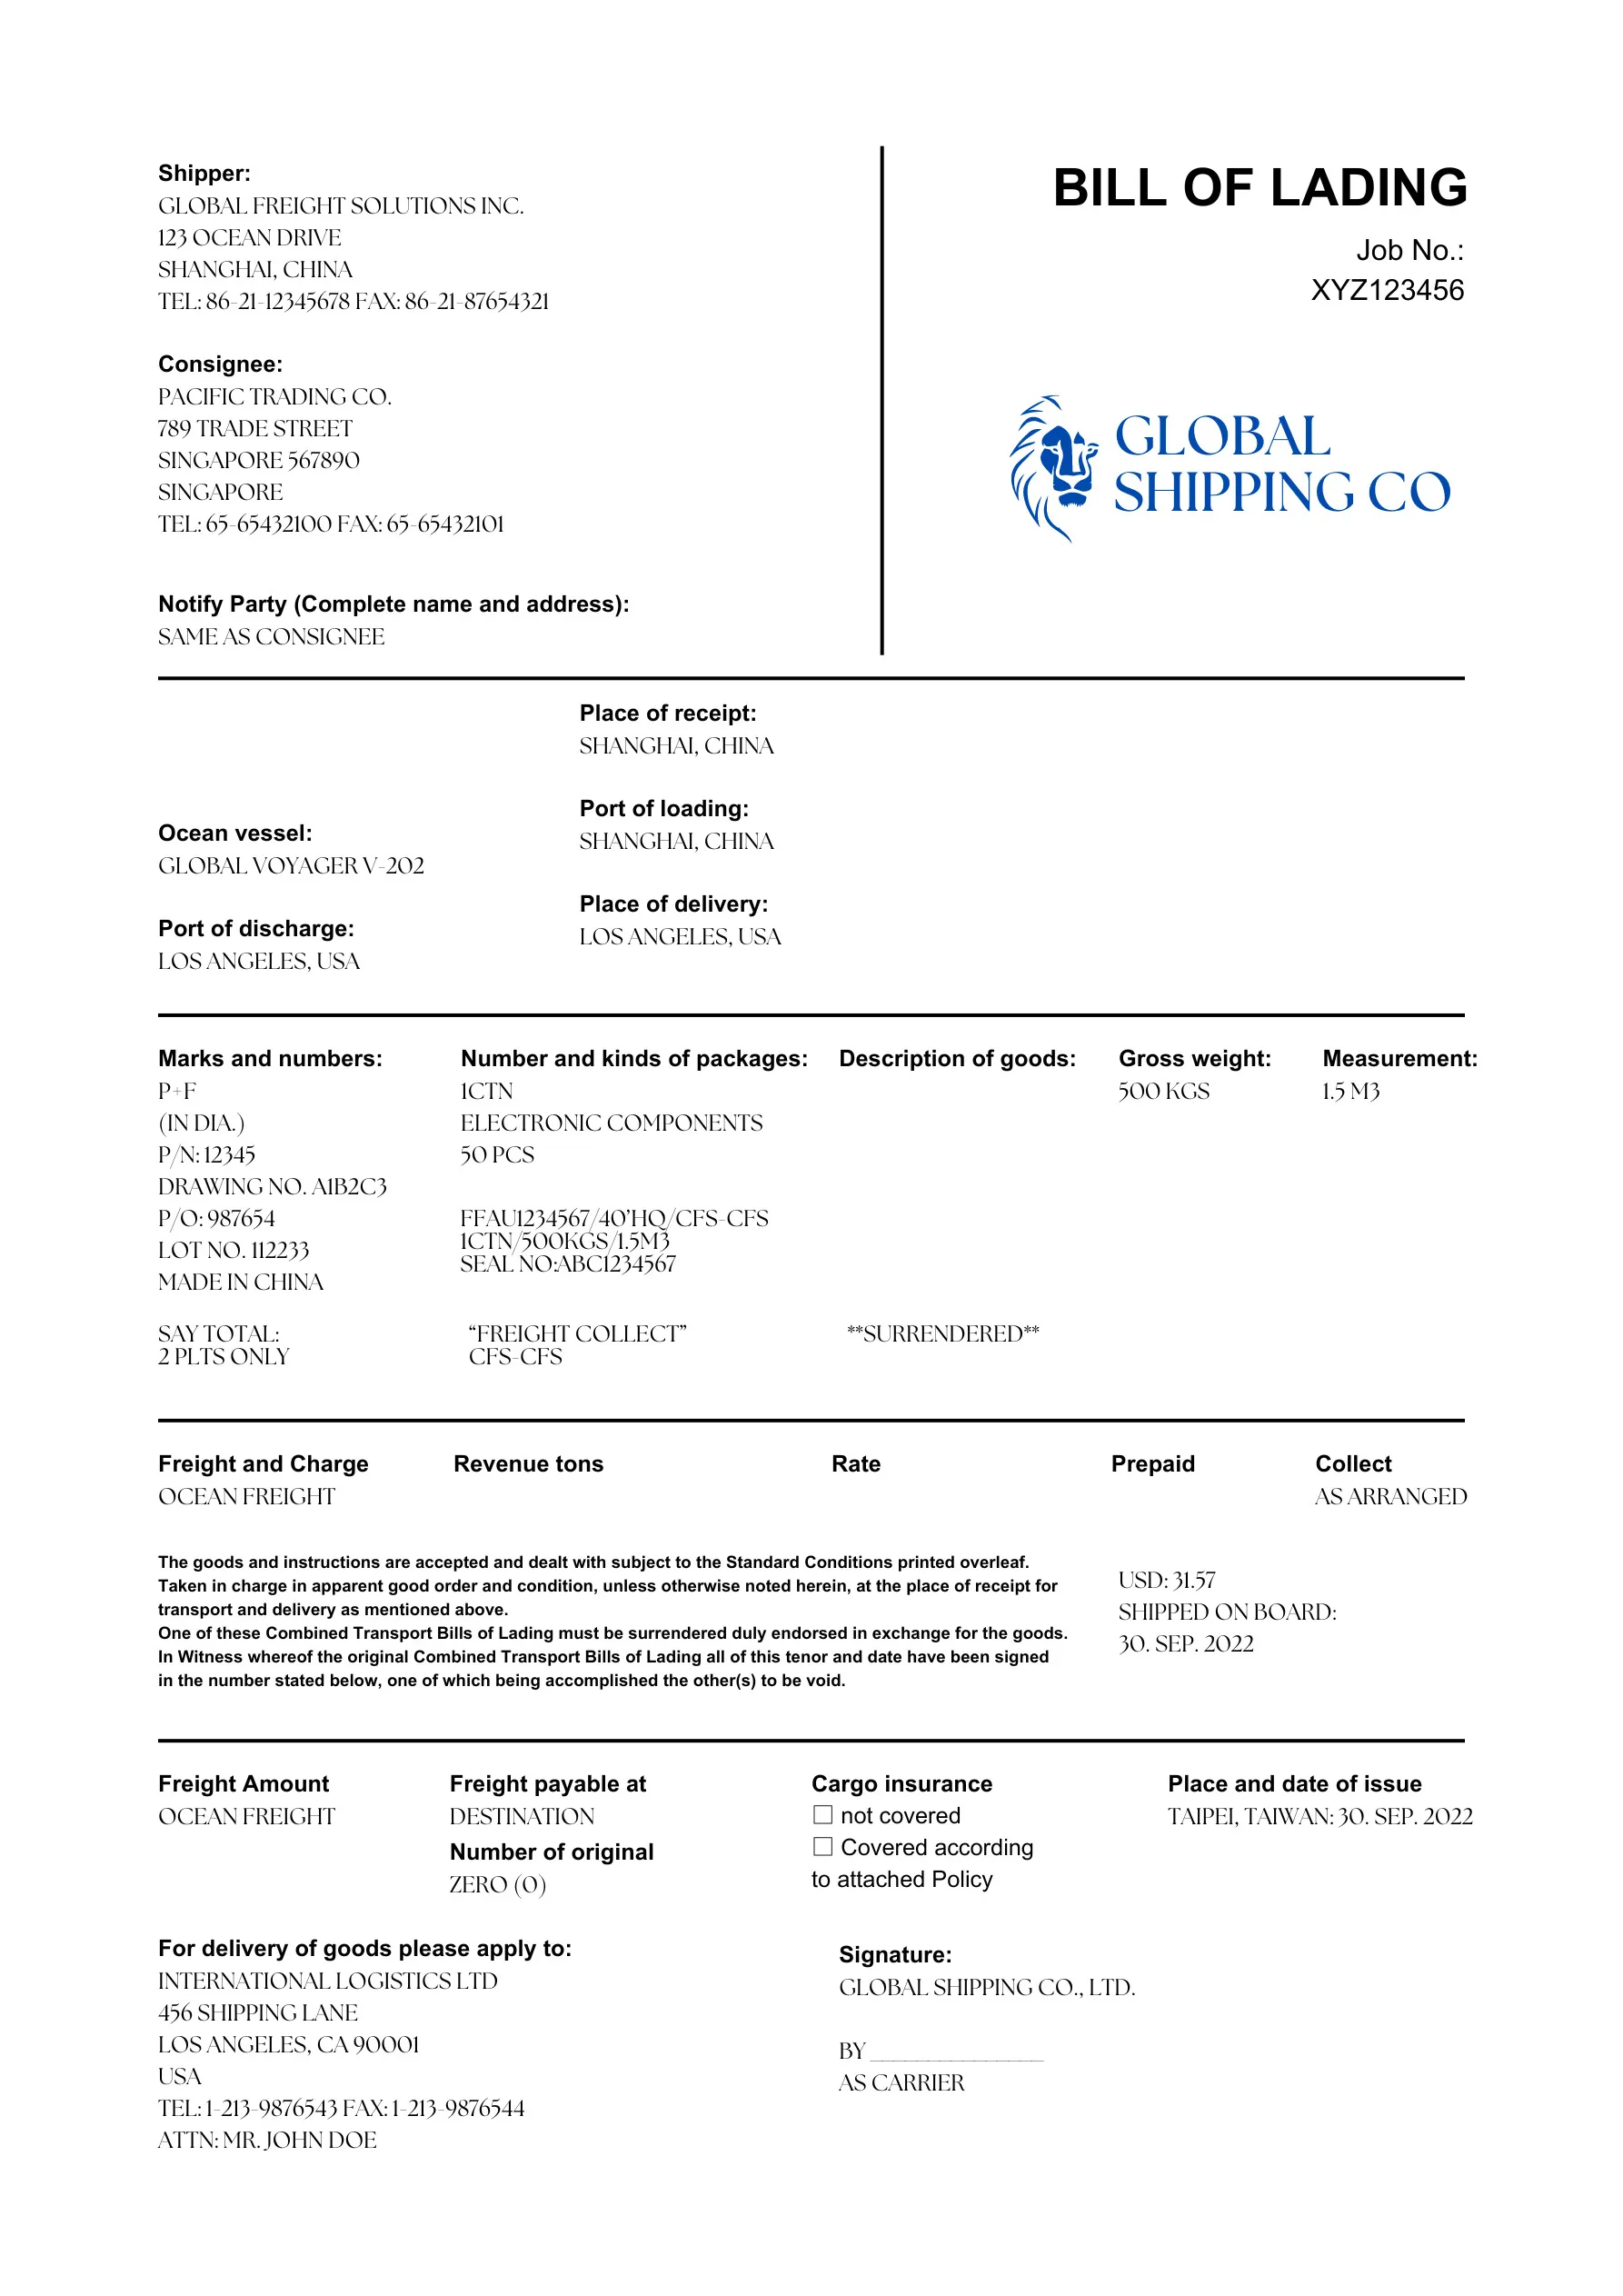
Mindee’s Bill Of Lading API uses deep learning to automatically, accurately, and instantaneously parse your documents details. In a few seconds, the API extracts a set of data from your PDFs or photos of Bill of Lading, including:
- Bill of Lading Number
- Shipper
- Consignee
- Notify Party
- Carrier
- Items
- Port of Loading
- Port of Discharge
- Place of Delivery
- Date of Issue
- Departure Date
Set up the API
Before making any API calls, you need to have created your API key.
- You'll need a Bill Of Lading. You can use one of the sample documents provided below.
- Access your Bill of Lading API by clicking on the corresponding product card in the Document Catalog
- From the left navigation, go to documentation > API Reference, you'll find sample code in popular languages and command line.
from mindee import Client, product, AsyncPredictResponse

# Init a new client
mindee_client = Client(api_key="my-api-key-here")

# Load a file from disk
input_doc = mindee_client.source_from_path("/path/to/the/file.ext")

# Load a file from disk and enqueue it.
result: AsyncPredictResponse = mindee_client.enqueue_and_parse(
    product.BillOfLadingV1,
    input_doc,
)

# Print a brief summary of the parsed data
print(result.document)
const mindee = require("mindee");
// for TS or modules:
// import * as mindee from "mindee";

// Init a new client
const mindeeClient = new mindee.Client({ apiKey: "my-api-key-here" });

// Load a file from disk
const inputSource = mindeeClient.docFromPath("/path/to/the/file.ext");

// Parse the file
const apiResponse = mindeeClient.enqueueAndParse(
  mindee.product.BillOfLadingV1,
  inputSource
);

// Handle the response Promise
apiResponse.then((resp) => {
  // print a string summary
  console.log(resp.document.toString());
});
using Mindee;
using Mindee.Input;
using Mindee.Product.BillOfLading;

string apiKey = "my-api-key-here";
string filePath = "/path/to/the/file.ext";

// Construct a new client
MindeeClient mindeeClient = new MindeeClient(apiKey);

// Load an input source as a path string
// Other input types can be used, as mentioned in the docs
var inputSource = new LocalInputSource(filePath);

// Call the product asynchronously with auto-polling
var response = await mindeeClient
    .EnqueueAndParseAsync<BillOfLadingV1>(inputSource);

// Print a summary of all the predictions
System.Console.WriteLine(response.Document.ToString());

// Print only the document-level predictions
// System.Console.WriteLine(response.Document.Inference.Prediction.ToString());
#
# Install the Ruby client library by running:
# gem install mindee
#

require 'mindee'

# Init a new client
mindee_client = Mindee::Client.new(api_key: 'my-api-key')

# Load a file from disk
input_source = mindee_client.source_from_path('/path/to/the/file.ext')

# Parse the file
result = mindee_client.parse(
  input_source,
  Mindee::Product::BillOfLading::BillOfLadingV1
)

# Print a full summary of the parsed data in RST format
puts result.document

# Print the document-level parsed data
# puts result.document.inference.prediction
import com.mindee.MindeeClient;
import com.mindee.input.LocalInputSource;
import com.mindee.parsing.common.AsyncPredictResponse;
import com.mindee.product.billoflading.BillOfLadingV1;
import java.io.File;
import java.io.IOException;

public class SimpleMindeeClient {

  public static void main(String[] args) throws IOException, InterruptedException {
    String apiKey = "my-api-key-here";
    String filePath = "/path/to/the/file.ext";

    // Init a new client
    MindeeClient mindeeClient = new MindeeClient(apiKey);

    // Load a file from disk
    LocalInputSource inputSource = new LocalInputSource(new File(filePath));

    // Parse the file asynchronously
    AsyncPredictResponse<BillOfLadingV1> response = mindeeClient.enqueueAndParse(
        BillOfLadingV1.class,
        inputSource
    );

    // Print a summary of the response
    System.out.println(response.toString());

    // Print a summary of the predictions
//  System.out.println(response.getDocumentObj().toString());

    // Print the document-level predictions
//    System.out.println(response.getDocumentObj().getInference().getPrediction().toString());

    // Print the page-level predictions
//    response.getDocumentObj().getInference().getPages().forEach(
//        page -> System.out.println(page.toString())
//    );
  }

}
API_KEY='my-api-key-here'
ACCOUNT='mindee'
ENDPOINT='bill_of_lading'
VERSION='1'
FILE_PATH='/path/to/your/file.png'

# Maximum amount of retries to get the result of a queue
MAX_RETRIES=10

# Delay between requests
DELAY=6

# Enqueue the document for async parsing
QUEUE_RESULT=$(curl -sS --request POST \
  -H "Authorization: Token $API_KEY" \
  -H "Content-Type: multipart/form-data" \
  -F "document=@$FILE_PATH" \
  "https://api.mindee.net/v1/products/$ACCOUNT/$ENDPOINT/v$VERSION/predict_async")

# Status code sent back from the server
STATUS_CODE=$(echo "$QUEUE_RESULT" | grep -oP "[\"|']status_code[\"|']:[\s][\"|']*[a-zA-Z0-9-]*" | rev | cut --complement -f2- -d" " | rev)

# Check that the document was properly queued
if [ -z "$STATUS_CODE" ] || [ "$STATUS_CODE" -gt 399 ] || [ "$STATUS_CODE" -lt 200 ]
then
  if [ -z "$STATUS_CODE" ]
  then
    echo "Request couldn't be processed."
    exit 1
  fi
  echo "Error $STATUS_CODE was returned by API during enqueuing. "

  # Print the additional details, if there are any:
  ERROR=$(echo "$QUEUE_RESULT" | grep -oP "[\"|']error[\"|']:[\s]\{[^\}]*" | rev | cut --complement -f2- -d"{" | rev)
  if [ -z "$ERROR" ]
  then
    exit 1
  fi

  # Details on the potential error:
  ERROR_CODE=$(echo "$ERROR" | grep -oP "[\"|']code[\"|']:[\s]\"[^(\"|\')]*" | rev | cut --complement -f2- -d"\"" | rev)
  MESSAGE=$(echo "$QUEUE_RESULT" | grep -oP "[\"|']message[\"|']:[\s]\"[^(\"|\')]*" | rev | cut --complement -f2- -d"\"" | rev)
  DETAILS=$(echo "$QUEUE_RESULT" | grep -oP "[\"|']details[\"|']:[\s]\"[^(\"|\')]*" | rev | cut --complement -f2- -d"\"" | rev)
  echo "This was the given explanation:"
  echo "-------------------------"
  echo "Error Code: $ERROR_CODE"
  echo "Message: $MESSAGE"
  echo "Details: $DETAILS"
  echo "-------------------------"
  exit 1
else

  echo "File sent, starting to retrieve from server..."

  # Get the document's queue ID
  QUEUE_ID=$(echo "$QUEUE_RESULT" | grep -oP "[\"|']id[\"|']:[\s][\"|'][a-zA-Z0-9-]*" | rev | cut --complement -f2- -d"\"" | rev)

  # Amount of attempts to retrieve the parsed document were made
  TIMES_TRIED=1

  # Try to fetch the file until we get it, or until we hit the maximum amount of retries
  while [ "$TIMES_TRIED" -lt "$MAX_RETRIES" ]
  do
    # Wait for a bit at each step
    sleep $DELAY

    # Note: we use -L here because the location of the file might be behind a redirection
    PARSED_RESULT=$(curl -sS -L \
      -H "Authorization: Token $API_KEY" \
      "https://api.mindee.net/v1/products/$ACCOUNT/$ENDPOINT/v$VERSION/documents/queue/$QUEUE_ID")

    # Isolating the job (queue) & the status to monitor the document
    JOB=$(echo "$PARSED_RESULT" | grep -ioP "[\"|']job[\"|']:[\s]\{[^\}]*" | rev | cut --complement -f2- -d"{" | rev)
    QUEUE_STATUS=$(echo "$JOB" | grep -ioP "[\"|']status[\"|']:[\s][\"|'][a-zA-Z0-9-]*" | rev | cut --complement -f2- -d"\"" | rev)
    if [ "$QUEUE_STATUS" = "completed" ]
    then
      # Print the result
      echo "$PARSED_RESULT"

      # Optional: isolate the document:
      # DOCUMENT=$(echo "$PARSED_RESULT" | grep -ioP "[\"|']document[\"|']:[\s].*([\"|']job[\"|'])" | rev | cut -f2- -d"," | rev)
      # echo "{$DOCUMENT}"

      # Remark: on compatible shells, fields can also be extracted through the use of tools like jq:
      # DOCUMENT=$(echo "$PARSED_RESULT" | jq '.["document"]')
      exit 0
    fi
    TIMES_TRIED=$((TIMES_TRIED+1))
  done
fi

echo "Operation aborted, document not retrieved after $TIMES_TRIED tries"
exit 1
<?php

use Mindee\Client;
use Mindee\Product\BillOfLading\BillOfLadingV1;

// Init a new client
$mindeeClient = new Client("my-api-key-here");

// Load a file from disk
$inputSource = $mindeeClient->sourceFromPath("/path/to/the/file.ext");

// Parse the file asynchronously
$apiResponse = $mindeeClient->enqueueAndParse(BillOfLadingV1::class, $inputSource);

echo $apiResponse->document;
- Replace my-api-key-here with your new API key, or use the "select an API key" feature and it will be filled automatically.
- Copy and paste the sample code of your desired choice in your application, code environment or terminal.
- Replace
/path/to/my/filewith the path to your document.
Always remember to replace your API key!
- Run your code. You will receive a JSON response with the Bill of Lading details.
API Response
Here is the full JSON response you get when you call the API:
{
    "api_request": {
        "error": {},
        "resources": [
            "document",
            "job"
        ],
        "status": "success",
        "status_code": 200,
        "url": "https://api.mindee.net/v1/products/mindee/bill_of_lading/v1/documents/.."
    },
    "document": {
        "id": "bae163d3-ea9c-4972-bd28-2a7598d3d424",
        "inference": {
            "extras": {},
            "finished_at": "2024-10-17T15:01:28.197000",
            "is_rotation_applied": true,
            "pages": [
                {
                    "extras": {},
                    "id": 0,
                    "orientation": {
                        "value": 0
                    },
                    "prediction": {}
                }
            ],
            "prediction": {..},
            "processing_time": 7.42,
            "product": {
                "features": [
                    "bill_of_lading_number",
                    "shipper",
                    "consignee",
                    "notify_party",
                    "carrier",
                    "carrier_items",
                    "port_of_loading",
                    "port_of_discharge",
                    "place_of_delivery",
                    "date_of_issue",
                    "departure_date"
                ],
                "name": "mindee/bill_of_lading",
                "type": "standard",
                "version": "1.1"
            },
            "started_at": "2024-10-17T15:01:20.640000"
        },
        "n_pages": 1,
        "name": "Bill_of_lading_sample.jpg"
    },
    "job": {
        "available_at": "2024-10-17T15:01:28.208000",
        "error": {},
        "id": "8ae70ce3-ef4f-44dc-af7c-738b54e44423",
        "issued_at": "2024-10-17T15:01:20.640000",
        "status": "completed"
    }
}
You can find the prediction within the prediction key found in document > inference > prediction for document-level predictions: it contains the different fields extracted at the document level, meaning that for multi-pages PDFs, we reconstruct a single object using all the pages.
    "document": {
				    ...
            "prediction": {
                "bill_of_lading_number": {
                    "value": "XYZ123456"
                },
                "carrier": {
                    "name": "GLOBAL SHIPPING CO",
                    "professional_number": null,
                    "scac": null
                },
                "carrier_items": [
                    {
                        "description": "ELECTRONIC COMPONENTS\nP/N: 12345\nDRAWING NO. A1B2C3\nP/O: 987654\nLOT NO. 112233\nMADE IN CHINA",
                        "gross_weight": 500.0,
                        "measurement": 1.5,
                        "measurement_unit": "cbm",
                        "quantity": 50.0,
                        "weight_unit": "kgs"
                    }
                ],
                "consignee": {
                    "address": "789 TRADE STREET, SINGAPORE 567890, SINGAPORE",
                    "email": null,
                    "name": "PACIFIC TRADING CO.",
                    "phone": "65-65432100"
                },
                "date_of_issue": {
                    "value": "2022-09-30"
                },
                "departure_date": {
                    "value": null
                },
                "notify_party": {
                    "address": "789 TRADE STREET, SINGAPORE 567890, SINGAPORE",
                    "email": null,
                    "name": "PACIFIC TRADING CO.",
                    "phone": "65-65432100"
                },
                "place_of_delivery": {
                    "value": "456 SHIPPING LANE, LOS ANGELES, CA 90001, USA"
                },
                "port_of_discharge": {
                    "value": "LOS ANGELES, USA"
                },
                "port_of_loading": {
                    "value": "SHANGHAI, CHINA"
                },
                "shipper": {
                    "address": "123 OCEAN DRIVE, SHANGHAI, CHINA",
                    "email": null,
                    "name": "GLOBAL FREIGHT SOLUTIONS INC.",
                    "phone": "86-21-12345678"
                }
            },
            "processing_time": 7.42,
            "product": {
                "features": [
                    "bill_of_lading_number",
                    "shipper",
                    "consignee",
                    "notify_party",
                    "carrier",
                    "carrier_items",
                    "port_of_loading",
                    "port_of_discharge",
                    "place_of_delivery",
                    "date_of_issue",
                    "departure_date"
                ],
                "name": "mindee/bill_of_lading",
                "type": "standard",
                "version": "1.1"
            },
            "started_at": "2024-10-17T15:01:20.640000"
        },
        "n_pages": 1,
        "name": "Bill_of_lading_sample.jpg"
    },
    "job": {
        "available_at": "2024-10-17T15:01:28.208000",
        "error": {},
        "id": "8ae70ce3-ef4f-44dc-af7c-738b54e44423",
        "issued_at": "2024-10-17T15:01:20.640000",
        "status": "completed"
    }
}
Extracted data
Using the above Bill of Lading example the following are the basic fields that can be extracted.
- Bill of Lading Number
- Shipper
- Consignee
- Notify Party
- Carrier
- Items
- Port of Loading
- Port of Discharge
- Place of Delivery
- Date of Issue
- Departure Date
Bill of Lading Number
- bill_of_lading_number: Unique identifier assigned to a Bill of Lading.
{
  "bill_of_lading_number": {
    "value": "XYZ123456"
  }
}
Shipper
- Shipper: The party responsible for shipping the goods.
- name: The name of the shipper.
- address: The address of the shipper.
- phone: the phone number of the shipper.
- email: the email address of the shipper.
{
  "shipper": {
    "address": "123 OCEAN DRIVE, SHANGHAI, CHINA",
    "email": null,
    "name": "GLOBAL FREIGHT SOLUTIONS INC.",
    "phone": "86-21-12345678"
  }
}
Consignee
- consignee: The party to whom the goods are being shipped.
- name: The name of the consignee.
- address: The address of the consignee.
- phone: the phone number of the consignee.
- email: the email address of the consignee.
{
  "consignee": {
    "address": "789 TRADE STREET, SINGAPORE 567890, SINGAPORE",
    "email": null,
    "name": "PACIFIC TRADING CO.",
    "phone": "65-65432100"
  }
}
Notify Party
- notify_party: The party to be notified of the arrivals of the goods.
- name: The name of the notify party.
- address: The address of the notify party.
- phone: the phone number of the notify party.
- email: the email address of the notify party.
{
  "notify_party": {
    "address": "789 TRADE STREET, SINGAPORE 567890, SINGAPORE",
    "email": null,
    "name": "PACIFIC TRADING CO.",
    "phone": "65-65432100"
  }
}
Carrier
- carrier: The shipping company responsible for the transport of the good.
- name: The name of the carrier.
- professional_number: The professional number of the carrier.
- scac: The Standard Carrier Alpha Code (SCAC) of the carrier.
{
  "carrier": {
    "name": "GLOBAL SHIPPING CO",
    "professional_number": null,
    "scac": null
  }
}
Items
- carrier_items: The goods being shipped.
- description: A description of the item.
- quantity: The quantity of the item being shipped.
- gross_weight: The gross weight of the item.
- weight_unit: The unit of measurement for weights.
- measurement: The measurement of the item.
- measurement_unit: The unit of measurement for the measurement.
{
  "carrier_items": [
    {
      "description": "ELECTRONIC COMPONENTS\nP/N: 12345\nDRAWING NO. A1B2C3\nP/O: 987654\nLOT NO. 112233\nMADE IN CHINA",
      "gross_weight": 500,
      "measurement": 1.5,
      "measurement_unit": "cbm",
      "quantity": 50,
      "weight_unit": "kgs"
    }
  ]
}
Port of loading
- port_of_loading: The port where the goods are loaded on the vessel.
{
  "port_of_loading": {
    "value": "SHANGHAI, CHINA"
  }
}
Port of Discharge
- port_of_discharge: The port where the goods are unloaded on the vessel.
{
  "port_of_discharge": {
    "value": "LOS ANGELES, USA"
  }
}
Place of Delivery
- place_of_delivery: The place where the goods are to be delivered.
{
  "place_of_delivery": {
    "value": "456 SHIPPING LANE, LOS ANGELES, CA 90001, USA"
  }
}
Date of Issue
- date_of_issue: The date when the bill lading is issued.
{
  "date_of_issue": {
    "value": "2022-09-30"
  }
}
Departure Date
- departure_date: The date when the vessel departs from the port of loading.
{
  "departure_date": {
    "value": null
  }
}
Updated 7 months ago