How to test webhooks?
While implementing webhooks might seem daunting, this tutorial offers a straightforward approach to:
- Create a webhook endpoint handler to receive event data POST requests.
- Register your endpoint within your Workflow using the webhook menu on the platform.
- Test your endpoint
Before deploying your webhook endpoint, we recommend testing your integration by setting up a local listener.
Create a webhook endpoint handler to receive event data POST requests.
For testing, you can use free services like https://webhook.site/ that allow you to get a webhook URL without setting up a web server.
Another solution is to use ngrock (free) to get secure public URL for your local web server. You can follow this process:
- Sign up
- Download and start the executable.
- Double click on the executable downloaded. A command window will appear.
- Configure ngrock:
Enter the following command to put your app online at an ephemeral domain forwarding to your upstream service.
For example, if it is listening on porthttp://localhost:5000, run:
ngrok http http://localhost:5000

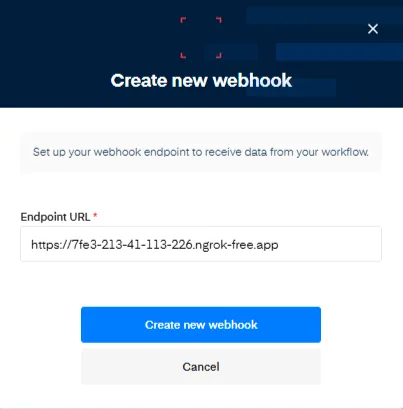
- Copy the forwarding address and create the webhook on the platform:
Register your endpoint within your Workflow using the webhook menu on the platform.

- Hit Create new webhook to finalise the creation.
Create your listener.
- Here is an example using Python and Flask.
from flask import Flask, request, jsonify

app = Flask(__name__)

@app.route('/', methods=['POST'])
def webhook_receiver():
    data = request.json  # Get the JSON data from the incoming request
    # Process the data and perform actions based on the event
    print("Received webhook data:", data)
    if data["execution"]["status"] == "validated":
        print("Document %s is Validated" %(data["execution"]["file"]["name"]))
    elif data["execution"]["status"] == "processed":
        print("Document %s is Processed" % (data["execution"]["file"]["name"]))
    elif data["execution"]["status"] == "processing":
        print("Document %s is being processed" % (data["execution"]["file"]["name"]))
    return jsonify({'message': 'Webhook received successfully'}), 200

if __name__ == '__main__':
    app.run(debug=True)
- You can add some specific actions here depending on the status of the
execution. - Run the code
Test your endpoint
You can use any of the sample codes (Python, …) provided in the documentation page to send your test document to the workflow.
from mindee import Client, WorkflowResponse
from mindee.parsing.common import ExecutionPriority

WORKFLOW_ID = "my-workflow-id"
API_TOKEN = "my-api*-token"
FILEPATH = "./documents/sample_invoice.jpeg"


# Init a new client
mindee_client = Client(api_key=API_TOKEN)

# Load a file from disk
input_doc = mindee_client.source_from_path(FILEPATH)

# Send the file to the workflow.
result: WorkflowResponse = mindee_client.execute_workflow(
    input_doc,
    WORKFLOW_ID,
    # Optionally, add an alias and a priority to the workflow.
    # alias="my-alias",
    # priority=ExecutionPriority.LOW
)

# Print the ID of the execution to make sure it worked.
print(result.execution.id)
- Do not forget to enter your API key and your Workflow ID.
- Execute your code to send the document .
You will see on the ngrock command window the Requests date - time and the status

- The first one being the status that it’s being processed.
- The second that the document has been processed.
Now let’s have a look at our python listener, we will see the payload received after sending the document.
{
  "execution": {
    "batch_name": null,
    "created_at": null,
    "file": {
      "alias": null,
      "name": "sample_invoice.jpeg"
    },
    "id": "067eea41-f640-48c7-a26c-0336245d6325",
    "inference": null,
    "priority": "medium",
    "public_url": <public-url>,
    "reviewed_at": null,
    "reviewed_prediction": null,
    "status": "processing",
    "type": "manual",
    "uploaded_at": "2024-12-09T15:06:19.945610+00:00",
    "workflow_id": "5e2cefde-56f1-4c36-b598-06ea868b61cf"
  },
  "webhook": {
    "event_id": "669527fa-09ce-4932-9a32-560840caed71",
    "event_type": "workflow.execution.create",
    "resources": [
      "execution"
    ]
  }
}
A similar one is sent when the document status is “processed” but with the extracted data, including the inference key that is now completed.
{
  "execution": {
    "batch_name": null,
    "created_at": "2024-12-11T13:52:34.420000",
    "file": {
      "alias": null,
      "name": "sample_invoice.jpeg"
    },
    "id": "b39a0179-d461-4086-ae39-f749af8b231a",
    "inference": {
      "extras": {},
      "finished_at": "2024-12-11T13:52:35.108000",
      "is_rotation_applied": true,
      "pages": [
        {
          "extras": {},
          "id": 0,
          "orientation": {
            "value": 0
          },
          "prediction": {...}
        }
      ],
      "prediction": {...}
      },
      "processing_time": 0.5624840259552002,
      "product": {
        "features": [],
        "name": "mindee/invoices",
        "type": "standard",
        "version": "4.9"
      },
      "started_at": "2024-12-11T13:52:34.420000"
    },
    "priority": "medium",
    "public_url": <public-url>,
    "reviewed_at": null,
    "reviewed_prediction": null,
    "status": "processed",
    "type": "manual",
    "uploaded_at": "2024-12-11T13:52:34.373936+00:00",
    "workflow_id": "5e2cefde-56f1-4c36-b598-06ea868b61cf"
  },
  "webhook": {
    "event_id": "8ac5b665-8baa-4d37-9664-7ca6aba24a82",
    "event_type": "workflow.execution.update",
    "resources": [
      "execution"
    ]
  }
}
The predictions key presents extracted data both at the document level and at the page level.
Finally, when you validate the document on the review interface, you will see another entry, with the reviewed data (reviewed_prediction):
{
  "execution": {
    "batch_name": null,
    "created_at": "2024-12-11T13:52:34.420000",
    "file": {
      "alias": null,
      "name": "sample_invoice.jpeg"
    },
    "id": "b39a0179-d461-4086-ae39-f749af8b231a",
    "inference": {
      "extras": {},
      "finished_at": "2024-12-11T13:52:35.108000",
      "is_rotation_applied": true,
      "pages": [
        {
          "extras": {},
          "id": 0,
          "orientation": {
            "value": 0
          },
          "prediction": {...}
		}
      ],
      "prediction": {...},
	  "processing_time": 0.5624840259552002,
      "product": {
        "features": [],
        "name": "mindee/invoices",
        "type": "standard",
        "version": "4.9"
      },
      "started_at": "2024-12-11T13:52:34.420000"
    },
    "priority": "medium",
    "public_url": <public-url>,
    "reviewed_at": "2024-12-11T13:53:31.137000",
    "reviewed_prediction": {...},
		"status": "validated",
    "type": "manual",
    "uploaded_at": "2024-12-11T13:52:34.373936+00:00",
    "workflow_id": "5e2cefde-56f1-4c36-b598-06ea868b61cf"
  },
  "webhook": {
    "event_id": "8f65bdb0-df8a-42c2-9c2e-5791922105c3",
    "event_type": "workflow.execution.update",
    "resources": [
      "execution"
    ]
  }
}
By following this tutorial you can create a local webserver to set your webhook and catch your payloads including the status, the processed data from the prediction and finally the validated data reviewed using the interface.
Updated 6 months ago
